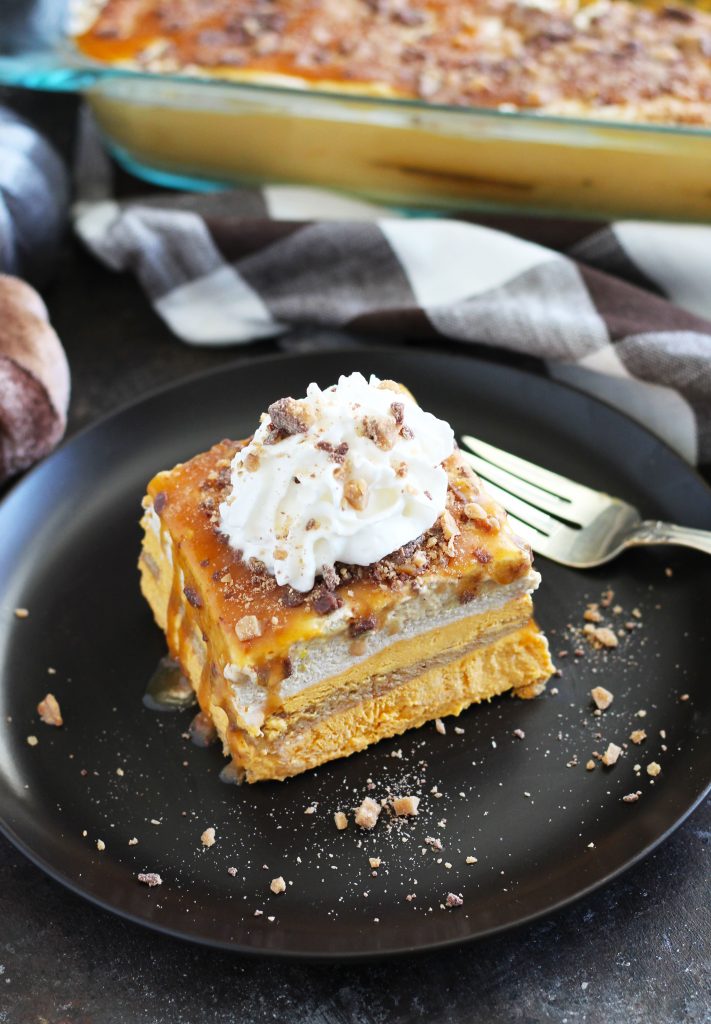
This Chocolate Peanut Butter Poke cake is so easy to make with box cake mix, chocolate fudge, vanilla pudding and plenty of peanut butter cups. Bring it along to your next summer BBQ and watch it disappear.

I can’t believe Father’s Day is already this weekend. Summer will be over before we know it! Meanwhile, I’ll be adding any needed ingredients for this decadent cake to my grocery cart. It is always a hit!
If you are loving the poke cake trend, be sure to try this Caramel Apple or Red White and Blue Cake. There are just so many great flavor options you could try.
What is a Poke Cake?
A poke cake is simply made by poking holes in it after it has been baked. You can use the back of a wooded spoon, or a large straw for best results. Pouring your favorite flavors evenly in the holes allows you to customize the results. Remember, the more holes you poke equal more gooey goodness!
Needed Ingredients
- 1 Box of Chocolate Cake Mix – Devil’s Food or Chocolate Fudge are great options; prepare with ingredients per package directions
- 10 oz. Jar of Chocolate Fudge – I used this Sea Salt Dessert topping and it was amazing
- 3.4 oz. Box of Instant Vanilla Pudding – chocolate would be good as well
- 1 1/4 C. Peanut Butter – 3/4 C. for the pudding mixture and 1/2 C. for the cool whip mixture
- 2 C. Milk – skim milk or 2% work fine
- 8 oz. Container of Whipped topping – defrosted
- 1 C. Peanut Butter Cups candy – roughly chopped; miniature or full size will work
Making a Chocolate Peanut Butter Poke Cake
- Prepare the cake mix according to the package directions and allow to cool completely.
- Poke holes around every 1 inch using the back of a wooden spoon or a large plastic straw.
- Whisk together the pudding mix and milk.
- Add 3/4 C. of peanut butter to the pudding mixture and whisk until smooth.
- Heat the jar of chocolate fudge for around 30 seconds or until pourable.
- Pour the chocolate fudge evenly over the cake holes.

- Pour the pudding mixture over the holes and spread until evenly coated over the cake top.
- Whisk together the whipped topping and 1/2 C. of Peanut Butter.
- Evenly Spread over the top.

- Top with roughly chopped peanut butter cups.

- Cover and refrigerate for at least 4 hours before serving.
Storing a Poke Cake
This cake should be stored covered in the refrigerator for at least 4 hours before serving. For best results, let the poke cake set overnight to give the cake plenty of time to get firm. Eat the cake within 5 days to avoid it becoming overly wet. To freeze a poke cake, wrap several layers of plastic wrap around the cake and top with aluminum foil. It should keep for around 2 months.

Flavor Variations
Make this recipe even easier by only pouring chocolate fudge in the holes. Finish, by topping it with the cool whip and peanut butter mixture. A can a sweetened condensed milk can also be substituted for the pudding mixture. Add additional sauces and toppings of your choice before serving. Chocolate chips or toffee bits are other great topping options. Chocolate syrup and extra whipped cream make this recipe even more decadent.
More to Love
Here are a few of my favorite ways to do chocolate!
-

- S’mores Pancakes
-

- Vanilla Pudding Banana Bread
-

- Banana Split Chocolate Bundt Cake
-

- Salted Caramel Chocolate Martini
-

- Easy Strawberry Rhubarb Cobber
-

- Chocolate Strawberry Cheesecake Lasagna
-

- Red White and Blue Jello Cake
-

- Red White and Blue Jello Shots

This Chocolate Peanut Butter Poke cake is so easy to make with box cake mix, chocolate fudge, vanilla pudding and plenty of peanut butter cups.
- 1 Box 1 Box of Chocolate Cake Mix - Devil's Food or Chocolate Fudge
- 10 Oz. Jar of Chocolate Fudge Topping
- 3.4 Oz. Box Instant Vanilla Pudding
- 1 1/4 C. Peanut Butter
- 2 C. 2% or Skim Milk
- 8 Oz. Container Whipped Topping
- 1 C. Peanut Butter Cup Candies; roughly chopped
-
Prepare the cake mix according to the package directions and allow to cool completely
-
Poke holes around every 1 inch using the back of a wooden spoon or a large plastic straw.
-
Whisk together the pudding mix and milk.
-
Add 3/4 C. of peanut butter to the pudding mixture and whisk until smooth.
-
Heat the jar of chocolate fudge for around 30 seconds or until pourable.
-
Pour the chocolate fudge evenly over the cake holes.
-
Pour the pudding mixture over the holes and spread until evenly coated over the cake top.
-
Whisk together the whipped topping and 1/2 C. of Peanut Butter.
-
Evenly Spread over the top of the cake.
-
Top with roughly chopped peanut butter cups.
-
Cover and refrigerate for at least 4 hours before serving.


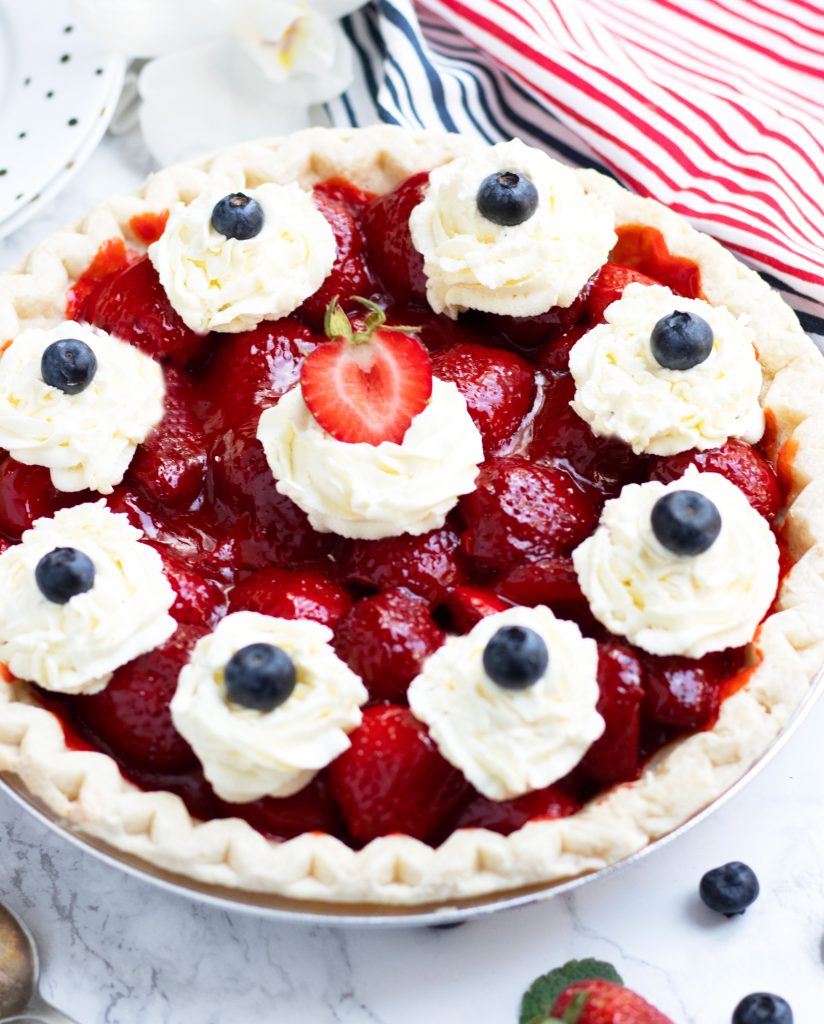
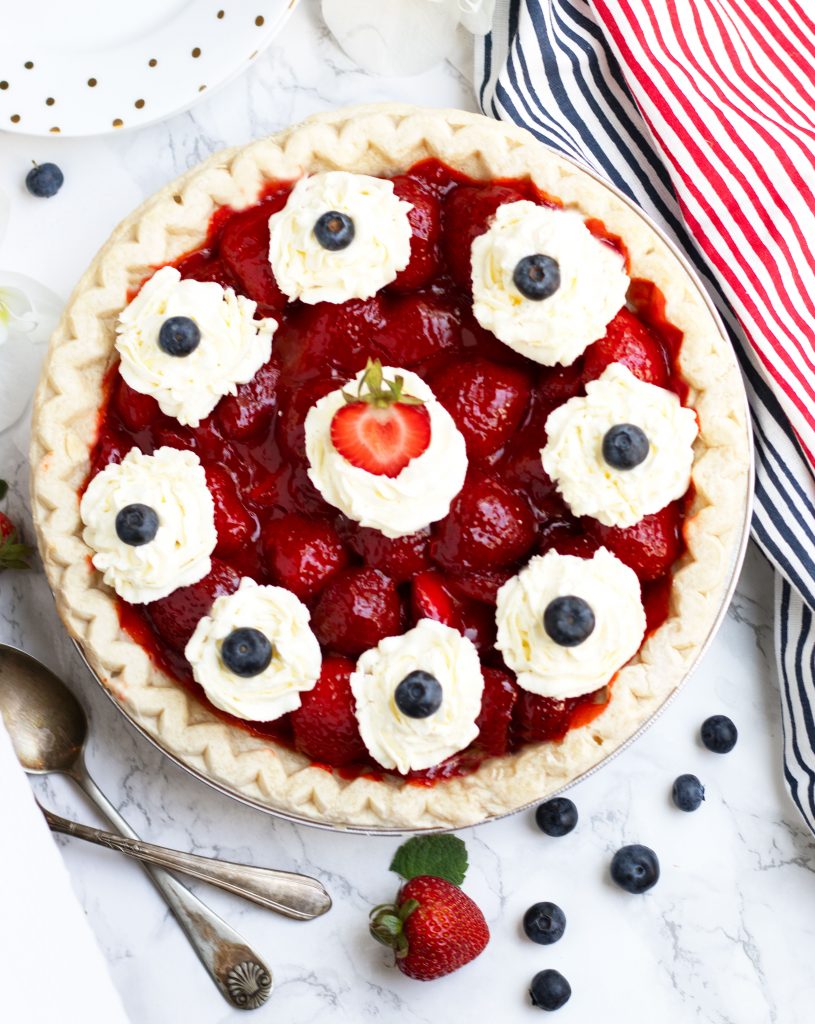
 Needed Ingredients for Easy Fresh Strawberry Pie